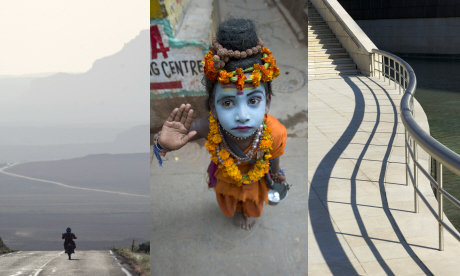
Cameras are designed to be held horizontally, but some subjects are just better captured from a different angle. It's time to turn your camera on its side!
The last Wanderlust Travel Photo of the Year competition was the best ever. Indeed, standards were so high that the judging (and arguing...) took far longer than usual. One thing we all agreed on, however, was the notable paucity of vertical shots. So I thought I’d take this opportunity to make a revelation: your camera works just as well on its side!
In fact, your camera often works better vertically than horizontally – some subjects cry out to be shot this way. Obviously, with a subject that is taller than it is wide, a vertical orientation allows you to fill the frame more effectively. You can use it to emphasise shape and form, and to crop out extraneous detail.
Shooting a portrait in vertical allows you to fill the frame with your subject’s face, showing all the details. Do use the whole frame, though – don’t just place the face in the centre and leave lots of dead space above.
A vertical orientation can also add meaning to your pictures. If you’re photographing something tall, such as a mountain or a tree, you can accentuate this tallness by shooting vertically and cropping so the top of the subject is near the top of the frame.
Any style of lens can be used in vertical orientation. A telephoto lens used this way can isolate and magnify a part of a landscape, making mountains seem higher and more striking. A wide-angle lens turned on its side can create a dynamic shot of an interior, cramming floor, walls and ceiling into the same picture.
Note, I deliberately use the terms ‘horizontal’ and ‘vertical’, rather than the more common ‘landscape’ and ‘portrait’, as the latter descriptions suggest that there is a correct orientation for each discipline. However, some of the best landscapes can be shot vertically, and the most expressive environmental portraits can be shot horizontally.
Above all, approach a subject with creativity – in many cases using the less-obvious crop will produce a more imaginative picture.
1. Don’t waste space
Shoot vertically to fill the frame with subjects that are taller than they are wide – you get less wasted space around the subject and a more dramatic impact.
2. Go wide-angle
Utilising the wide field of view of a very wide-angle lens on its side will allow you to fit in a large amount of the vertical scene. You can create dynamic interior shots, capturing wall and ceiling in the same picture.
3. Use common sense
Some subjects are just vertical! Shooting them in this orientation just looks right, accentuating their shape while cropping out unimportant parts of the image.
4. Emphasise patterns
A vertical orientation can allow you to isolate and accentuate patterns and details that would not be so prominent horizontally.
1. If you only remember one thing
Think vertical! When you assess a subject, consider whether it would benefit from a vertical crop. Try both: take a more familiar horizontal crop then switch to vertical, perhaps zooming in to fill the frame and create a tighter, more immediate picture.
2. Tech tip
Be careful how you crop. Don’t just place the subject in the centre of the frame – this can result in a lot of wasted space. I move the focus point to the desired part of the frame before I shoot, rather than just using the centre point and recomposing – this forces you not to place the subject bang in the middle.
3. One for the kitbag
You don’t need any special equipment, though some cameras can take a vertical battery grip, which often boosts shooting speed and has a duplicate set of controls, optimised for shooting vertically.
Check out more of Steve Davey's photography tips here | Contributors... More
Photography tips: shooting open spaces | Advice... More
Want to improve your travel photography? Join Wanderlust for a half-day workshop | Events... More
10 photography rules for the road | Inspire me... More
Photography tips: shooting perfect portraits | Advice... More